CamBar Calibration
What Is CamBar Calibration?
CamBar Calibration is a process that refines and updates the internal calibration of the CamBar.
Calibration may be required following physical shock or mishandling, such as:
- Dropping the CamBar
- Transporting the CamBar without adequate protection
- Heavy vibration or impact during shipping
The calibration process improves the accuracy of the CamBar’s internal scale and tracking performance.
Before You Begin
CamBar Calibration should only be performed when required.
Before calibrating:
- Use the Scale Check tool to determine whether calibration is necessary
- Ensure adequate time and space are available to complete and verify the process
- Prepare an environment with stable, high-quality tracking features
Improper calibration can significantly reduce tracking quality.
Scale Check Guidance
The Scale Check tool should always be used before and after calibration.
Lower scale error values indicate better calibration accuracy.
A well-calibrated CamBar will typically measure approximately:
- 0.5–1% scale error
It is critical that all measurements are performed carefully and accurately. Poor measurements can incorrectly indicate a calibration issue when none exists.
When performing a scale check:
- Move the CamBar through the environment at least once before measuring
- Ensure measurements are physically accurate
- Avoid rushed or unstable movements
Recommended Setup
Connecting the CamBar directly to the Origin is recommended during calibration.
While not required, this can improve:
- System responsiveness
- Tracking stability
- Overall calibration robustness
Typical calibration time:
- 5–10 minutes, including validation
Avoid starting calibration unless there is sufficient time to fully verify the results.
Relearning Tracking Configs
Changes in CamBar calibration can require marker based tracking configurations to be relearnt
Calibration Environment Requirements
CamBar Calibration works by observing stable tracking features from multiple viewpoints.
A poor environment can reduce calibration quality or cause calibration failure.
Natural Tracking
Good Tracking Features
Good calibration environments contain:
- Nearby features within approximately 2–5m
- Flat textured surfaces
- Static objects with visible detail
Examples include:
- Posters
- Rugs
- Logos
- Textured walls
- Furniture
Poor Tracking Features
Avoid environments containing:
- Reflections
- Moving people
- Moving foliage
- Bright glare
- Repetitive patterns
- Thin geometric structures
- Features that change appearance significantly between viewpoints
Examples of problematic features:
- Lighting grids
- Lens calibration charts
- Repeated tile patterns
- Reflective surfaces
Avoid features whose appearance changes significantly from different viewpoints. For example, reflections or partially occluded objects may appear inconsistent as the CamBar moves, reducing tracking quality.
Marker Mode Guidance
NOTE: Marker Mode calibration is not recommended when markers are 15m or more from the CamBar.
Marker mode tracking is a feasible option for CamBar calibration and is recommended when conducting calibration in Marker based studios
Calibration Procedure
Verify Calibration Is Required
Use the Scale Check tool to confirm that CamBar Calibration is necessary before beginning.
Refer to the CamBar Measure Tool documentation for detailed Scale Check instructions.
Prepare the Environment
Choose an area with stable, high-quality tracking features.
Avoid:
- Reflections
- Moving objects
- Crowded environments
- Large repetitive patterns
Open the Calibration Assistant
Open the Connection Status menu.
Shift + Click to access the Engineering Menu.
Select:
- Natural Mode, or
- Marker Mode
depending on the environment being used.
Begin Learning the Environment
Face the CamBar toward an area containing good tracking features.
Slowly move the CamBar while keeping the area in view.
Observe the environment from multiple viewpoints as though scanning it.
Important
- Move slowly and smoothly
- Avoid fast motion
- Keep tracking features visible throughout the process
Continue Until Learning Completes
The system will indicate when sufficient movement and environmental learning has been completed.
Run Calibration
Press Calibrate to generate a refined calibration.
Once complete:
- Press Persist to save the calibration to the CamBar
Verify Results
Perform another Scale Check after calibration.
This is strongly recommended to confirm that:
- Scale accuracy has improved
- Calibration quality is acceptable
Severely degraded CamBars may require multiple calibration passes to progressively improve calibration quality.
Finish
Once the Scale Check results have measurably improved, the Calibration Assistant can be closed.
What If Calibration Fails?
Calibration can fail for several reasons, including:
- The existing calibration is too degraded to refine
- Poor tracking features were learned during the environment scan
- Excessive movement or unstable tracking during calibration
Troubleshooting
Repeat the Learn Phase
Retry the calibration process using:
- Better tracking features
- A smaller scanning area
- More stable environmental conditions
Focus on nearby, textured, static features.
Factory Reset the CamBar
Factory Reset restores the CamBar to its original factory calibration.
This can provide a stable baseline for further refinement.
Factory calibration may not be optimal. After a factory reset always perform a scale check
Factory Reset is available from the first page of the CamBar Calibration Assistant.
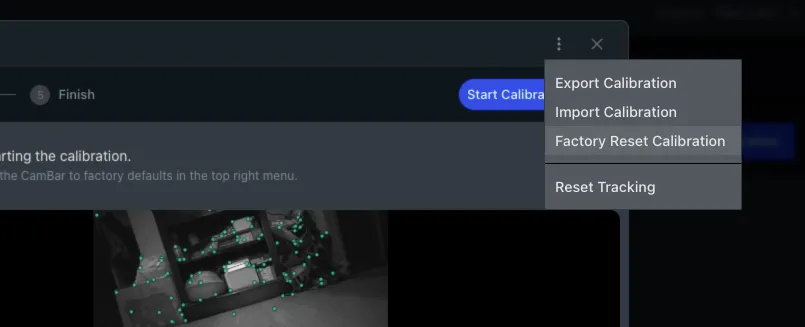
Importing and Exporting Calibration
Calibration import/export is available from the CamBar Calibration menu.
These functions are only available when accessing the UI through a web browser.
Exporting Calibration
Exported calibration files are:
- Downloaded through the browser
- Saved to the browser’s default download location
Importing Calibration
When importing:
- A file picker window will appear
- Select the desired calibration file from the local file system
Calibration files are tied to a specific CamBar serial number.
It is not possible to import calibration data from a different CamBar. A notification will appear if the serial numbers do not match.
Tips & Best Practices
- The CamBar does not need to be mounted to the camera during calibration
- Handholding the CamBar can make environment learning easier
- Handholding can also simplify Scale Check measurements
- Move slowly throughout the process
- Fast motion can reduce calibration quality
- Verify improvements using Scale Check after every calibration pass
- Multiple passes may be required for severely degraded calibration states